Underwater photos have a habit of disappointing. The reef glowed turquoise and gold through a mask, the fish and the divers looked warm and alive, and then the photo that comes up on the screen afterwards is flat, hazy, and cast an unmistakable green or blue. It happens with an expensive camera in a housing just as often as it happens on a phone or an action cam, and it isn't a sign that anything was done wrong. It's physics: water absorbs light unevenly and fast, and by the time light reaches a lens, much of the colour that made the scene beautiful to the eye has already been filtered out of it. This guide explains why underwater photos lose their colour, a few habits that reduce the cast while shooting, and — because most divers only think about colour once they're looking at the results — exactly how to fix the photos and video already sitting in a camera roll, for free.
Why underwater photos come back green or blue
Sunlight looks white, but it's really a mixture of every colour in the visible spectrum, and each colour carries a different wavelength. The moment light enters water, the water starts absorbing it, and it doesn't absorb every wavelength at the same rate. Long-wavelength colours go first: red is largely absorbed within about five metres, orange follows by roughly ten metres, and yellow is mostly gone by around twenty metres. Green survives a little further before fading, and blue — the shortest, most energetic wavelength in daylight — travels deepest of all, sometimes visible past sixty metres in very clear water. A scene that looked full and vividly coloured to the naked eye, helped along by a brain that constantly compensates for colour without a diver noticing, arrives at a camera's sensor with entire bands of that spectrum already missing, before the shutter is even pressed.
Which cast shows up in the final photo depends on the water itself. In clear, deep, oceanic water, blue is usually the last colour left standing, so the whole frame skews a cool, oceanic blue. In shallower, coastal, or plankton- and sediment-rich water — much of the Red Sea's shallow reef and lagoon water included — suspended particles scatter more green wavelengths back toward the lens, and the same underlying loss of red produces a murkier green cast instead. Either way, the mechanism is identical: colour is being subtracted from the light before it ever reaches the camera.
A second, unrelated problem often shows up in the same shot: backscatter. Every stretch of water carries some suspended sediment, plankton or tiny bubbles, invisible to the naked eye but not to a lens. Any light aimed at a subject — a flash, a strobe, a video light — bounces off those particles on its way there and back, appearing in the final image as a field of small bright specks, especially with a built-in flash pointed straight ahead. Neither effect is a fault with the equipment; both are simply what water does to light, on every camera, on every dive.
It's about distance, not just depth
The detail that catches most divers out is that colour loss is a distance effect, not purely a depth effect. It's the total length of water the light travels through — from its source to the subject, and back again to the lens — that determines how much colour survives, and that distance can be horizontal as easily as vertical. A subject five metres below the surface has lost roughly the same amount of red as a subject five metres away across open water at any depth, because the light travelled the same distance through the same water either way. That's why the far side of a reef often looks flatter and bluer in a photo than the sand a metre from the fins, even at the same depth: the far reef is simply further from the lens.
| Subject 1–2 m from the lens | Subject 8–10 m from the lens | |
|---|---|---|
| Red light remaining | Mostly still present | Almost completely gone |
| What the photo looks like | Reasonably close to true colour | Flat, blue-green and washed out |
| Correction needed afterwards | Light | Significant colour restoration |
This is also why one flat correction rarely fixes a whole underwater photo at once: the near sand and the far reef in the very same frame have lost different amounts of colour, and need different amounts back.
Reduce the colour cast while you shoot
Colour loss isn't entirely unavoidable. A handful of habits, mostly involving getting closer to the subject, meaningfully reduce how much correction a photo needs afterwards:
- Get close. Minimising the water between the lens and the subject is the single biggest improvement available, since it shortens the distance the light has to survive.
- Add light. A dive torch, video light or strobe held close to the subject reintroduces the red and orange wavelengths the water has already stripped from the ambient sunlight.
- Shoot shallow, in good sun. Bright light and shallower water both mean more of the original colour spectrum is still present to work with.
- Set a custom white balance underwater. Most cameras, and many action cams, allow a manual white balance to be set at depth — it corrects the tint far more accurately than an automatic setting built for dry land.
- Try a colour filter. In clear blue water, a red filter fitted over the lens (roughly 3–12 metres) visibly warms up natural-light shots; a magenta filter does the same job in green water. Neither helps with shots lit by an artificial light, which already carries its own full spectrum.
- Shoot RAW where possible. A RAW file keeps far more of the sensor's original colour data than a compressed JPEG, giving more to work with afterwards.
- Keep the sun behind you. Shooting toward the light source worsens contrast and backscatter alike.
These habits reduce the cast; they rarely eliminate it completely beyond a metre or two of water. Even a well-lit, carefully composed shot on a good camera usually still needs some correction afterwards to look the way the reef actually felt in person — true of every underwater photographer, and no sign anything was done wrong.
Fixing photos (and video) you already have
For photos already taken, the challenge is that colour loss isn't uniform across a single frame — as the table above shows, the near sand and the far reef in the same shot have lost very different amounts of colour. A single white-balance slider in a phone's photo editor makes one flat adjustment to the whole image. Nudge it to fix the blue-green far reef and the near, already-reasonable sand turns unnaturally warm; leave it set for the near subject and the far reef stays cast. General-purpose editors such as Snapseed or Lightroom can help with practice — adjusting individual colour channels or working on one selection at a time — but they weren't built to model how colour is lost underwater.
Dedicated underwater colour-correction tools take a different approach: rather than one blanket slider, they estimate how much colour has been lost at different points across the frame and correct the scene more evenly, restoring natural colour without over-saturating part of the image into an unnatural red. RAW isn't required for this to work well — it gives a tool more original data to recover, but ordinary JPEGs straight off a phone or action cam correct nicely too.
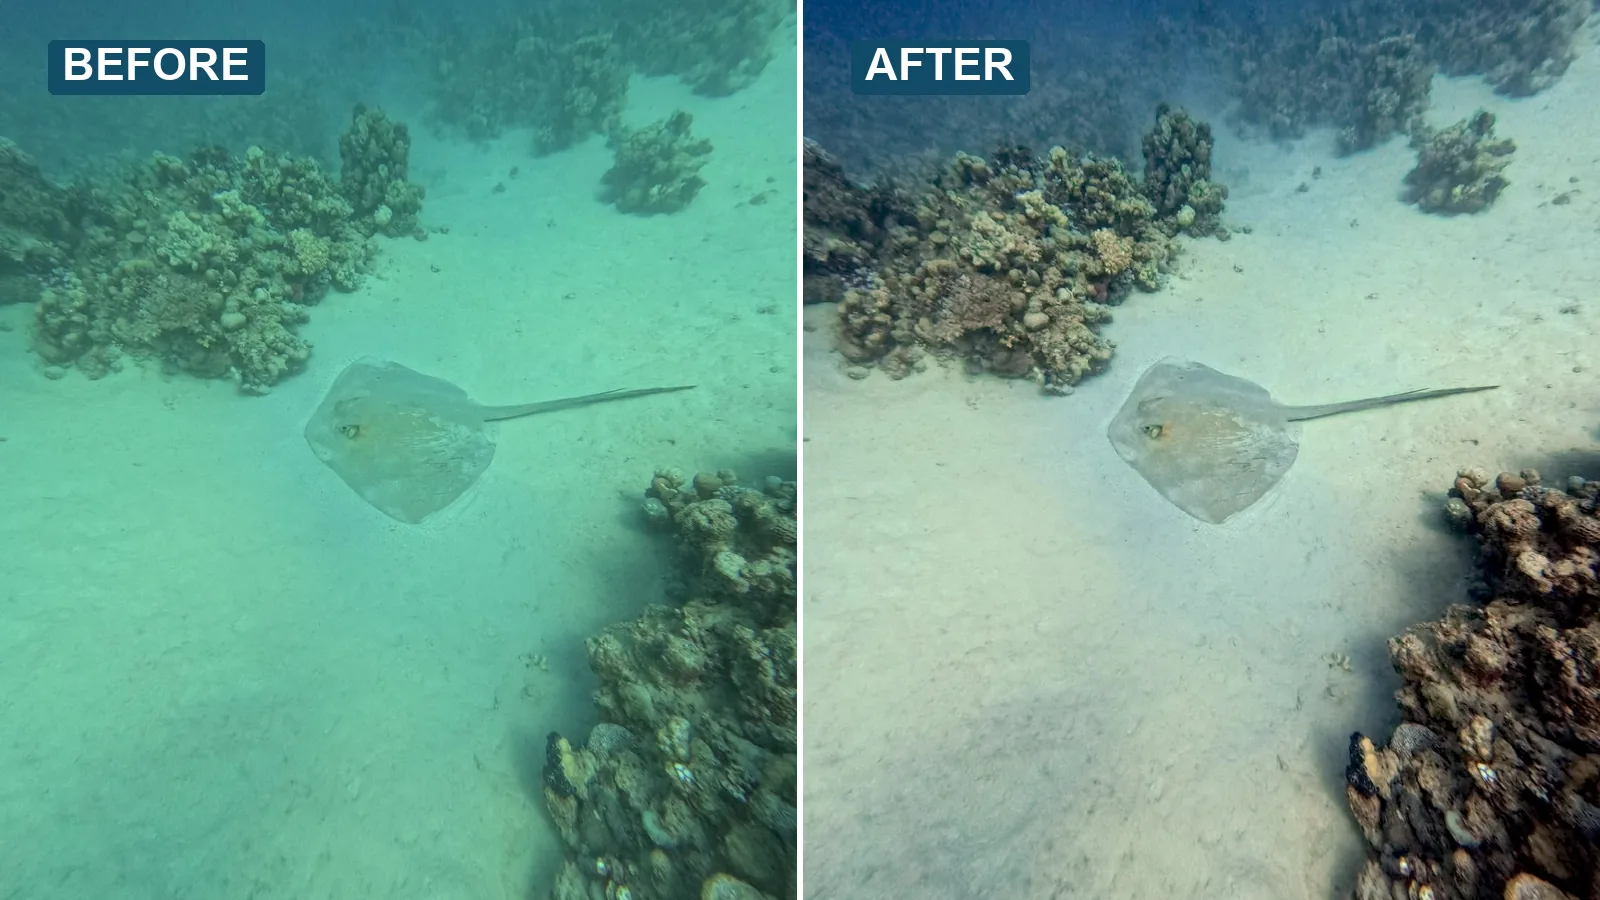
Fix your underwater photos free with Aqura FX
Aqura FX is a free underwater photo and video corrector that runs right in the browser — nothing to install and nothing uploaded, so photos and clips stay on the device they were taken from. It works on a phone or a computer, corrects the green or blue colour cast automatically the moment a file is opened, and a simple slider makes it easy to fine-tune the result.
Open Aqura FX →What about video?
Underwater video suffers from exactly the same colour loss as stills, for exactly the same reason, and footage often looks worse for it — a cast that's mildly distracting in a single photo becomes much harder to ignore across several minutes of moving reef. The correction works the same way: a tool built to understand how colour fades underwater can process a clip just as it processes a photo, restoring natural colour throughout without adjusting every frame by hand. Aqura FX handles clips as well as photos, which matters for anyone coming back from a dive with more footage than stills.
Does RAW or JPEG make a difference?
RAW and JPEG both correct well, but they aren't quite equivalent. A JPEG is processed and compressed in-camera the moment it's taken, which discards some of the sensor's original colour data permanently — there's simply less left for any tool, free or paid, to recover. A RAW file keeps that data intact, so a correction tool has more to work with and can typically pull back slightly more natural detail in the most colour-starved parts of a frame, such as a subject shot from several metres away.
That said, RAW isn't a requirement for a good result. Most cameras divers actually use underwater — phones in a housing, action cams, and plenty of compact cameras — shoot JPEG only, and they correct convincingly well. Shoot RAW when the camera supports it and there's room on the memory card; otherwise, an ordinary JPEG is a perfectly good starting point.
A note for the Red Sea
The Red Sea's renowned clarity — visibility on many offshore reefs and walls regularly runs 20–30 metres, sometimes more — is exactly the condition that produces a strong blue cast rather than a green one. Clear, deep, oceanic water like this filters out red and orange fast, leaving photos of even brightly coloured hard and soft corals looking cool and blue-toned once a diver is more than a couple of metres from the subject. Shallower lagoons, house reefs and areas closer to the coast, where the water carries more sediment, tend to skew slightly greener instead. Either way, the same fix applies: get close where possible, add light for colour at range, and correct the cast in the resulting photos and video afterwards. A wreck like the Thistlegorm, or a drift along an outer reef wall, shot from a few metres back to capture the whole scene, are classic examples of shots that look flat and blue straight off the camera and come back to life with a proper colour correction.
Frequently asked questions
Why do my underwater photos look green or blue?
Water absorbs light unevenly, and it happens fast: red is largely gone by around 5 metres, orange follows by about 10 metres, and yellow fades out by roughly 20 metres, leaving mostly blue and green light behind. In clear, deep, oceanic water, blue is usually the last colour standing, so the whole photo skews cool and blue. In shallower, plankton-rich or coastal water, suspended particles scatter more green back toward the lens instead, producing a green cast. Either way, the colour was already missing from the light by the time it reached the camera.
Can you fix an underwater photo that's too blue or too green?
Yes, in most cases. How much natural colour comes back depends on how much survived in the original file — a photo taken close to the surface or right up against the subject has more red left to recover than one taken from far away or very deep, where almost none remains. A simple white-balance adjustment helps a little, but a dedicated underwater colour-correction tool that treats the whole scene, rather than applying one flat setting everywhere, restores colour far more evenly across the frame.
Do I need Photoshop or Lightroom to correct underwater photos?
No. Free, browser-based tools can correct the colour cast without any subscription, account or software install. Shooting in RAW format gives a correction tool more original colour data to work with, but it isn't required — ordinary JPEGs and phone photos correct well too.
Does colour correction work on underwater video too?
Yes. Video suffers exactly the same colour loss as photos, for exactly the same reason, and it can be corrected the same way. Tools built for underwater colour correction, such as Aqura FX, handle video clips as well as photos.
How do I stop my photos going green or blue in the first place?
Get as close to the subject as practical, since distance through water is what strips out the colour. Add a dive light or strobe to put red back at close range, shoot in shallower water in good sun when possible, and set a manual or custom white balance underwater — most cameras and action cams allow this. In clear blue water, a red filter fitted over the lens (roughly in the 3–12 metre range) also helps restore natural-light colour; a magenta filter does the equivalent job in green water. Shooting in RAW, where available, leaves more colour data to work with afterwards.
Is there a free underwater photo editor?
Yes — Aqura FX is a free underwater photo and video corrector that runs directly in the browser, needs no sign-up, and doesn't upload the files anywhere.
Will correcting the colour make my photos look fake or over-red?
It shouldn't, if the tool is built for the job. A good underwater corrector restores the colour that was actually there rather than pushing red across the whole image, which is what a single blunt white-balance slider tends to do. If a result ever looks too warm, a fine-tune control can dial the correction back.
Sources & references
- PADI — Five Tips for Getting Started with Underwater Photography (getting close to the subject and using a dive light or strobe to restore lost colour).
- PADI — 6 Tips for Editing Your Underwater Photos (correcting white balance and colour after a dive).
- Divers Alert Network (DAN) — Recovering Color in Underwater Photography (how colour is lost with depth and distance, and how it can be recovered afterwards).
- General oceanographic and underwater-photography guidance on light absorption by wavelength in seawater (red and orange absorbed first, blue penetrating deepest) and on backscatter caused by suspended particles reflecting light back toward the lens.
This is an educational guide to the physics of underwater colour loss and how to correct it; it does not recommend or endorse specific camera brands or models. Verified September 2026.